My Motto

May the muffin rise to greet you, may your friends be always at your door, and until we meet again, warm a single-malt in the palm of your hand and make something homemade for someone you love.

Tuesday, January 17, 2012

Kickin Kale

"Kale is my best friend.  I eat Kale salad.  I put it in my smoothies, kale in my soup.  Kale, kale, kale! I feel like Popeye. I love it!"
~Alanis Morrissette (explaining her kale obsession to Runner's World)
I  know, I know....a big pile of green stuff doesn't photograph as well as say, a cupcake, but HEY!...we got excited about these greens, therefore they qualify for a post.  Besides, they're incredibly good for you and are perfect this time of year when garden fresh veggies are but a faint memory.  We went crazy for them.  After our first experience last week, they were so good we had to have them again, asap.

In our market they sell big bags of pre-washed and chopped kale and collard greens which make it really easy.  I bought the big bag of kale with the thought of making kale chips, but when it was evident that wasn't going to happen, I looked up a recipe to cook them.  Not discovering anything appealing, I decided to cook them like good 'ole southern collard greens.  That means long and slow, and with bacon!  I found the recipe on Allrecipes.com.  The original recipe, although delicious, was WAY too salty, so I've adjusted it.  The huge one pound bag cooks down much more than you would imagine.  I was shocked that the Mister and I polished it all off by ourselves. By the way, just a little tip;  they go great with garlicky mashed potatoes and any hearty meat, and if that meat has gravy, EVEN BETTER!

Kickin Kale
Inspired by a recipe for collard greens found on Allrecipes.com


1 tablespoon olive
3 slices bacon
1 large onion, chopped
2 cloves garlic, minced
1/2 teaspoon salt  (taste towards end of cooking, and add more if needed)
1 teaspoon pepper
3 cups chicken broth
1 pinch red pepper flakes
1 pound fresh kale, washed and chopped into 2-inch pieces


Heat oil in a large pot over med-high heat.  Add bacon and cook until crisp.  Remove bacon, crumble and return to pan.  Add onion and cook until tender, about 5 minutes.  Add garlic and stir around just until fragrant, about 1 minute.  Add kale and cook until it starts to wilt.
Pour in chicken broth, and add salt, pepper and pepper flakes.  Reduce heat to low, cover and simmer for 45-55 minutes until broth is mostly boiled off and greens are tender.  ENJOY!

Friday, January 6, 2012

White Chicken Tortilla Soup

"Soup is a lot like a family. Each ingredient enhances the others; each batch has its own characteristics; and it needs time to simmer to reach full flavor."

~Marge Kennedy
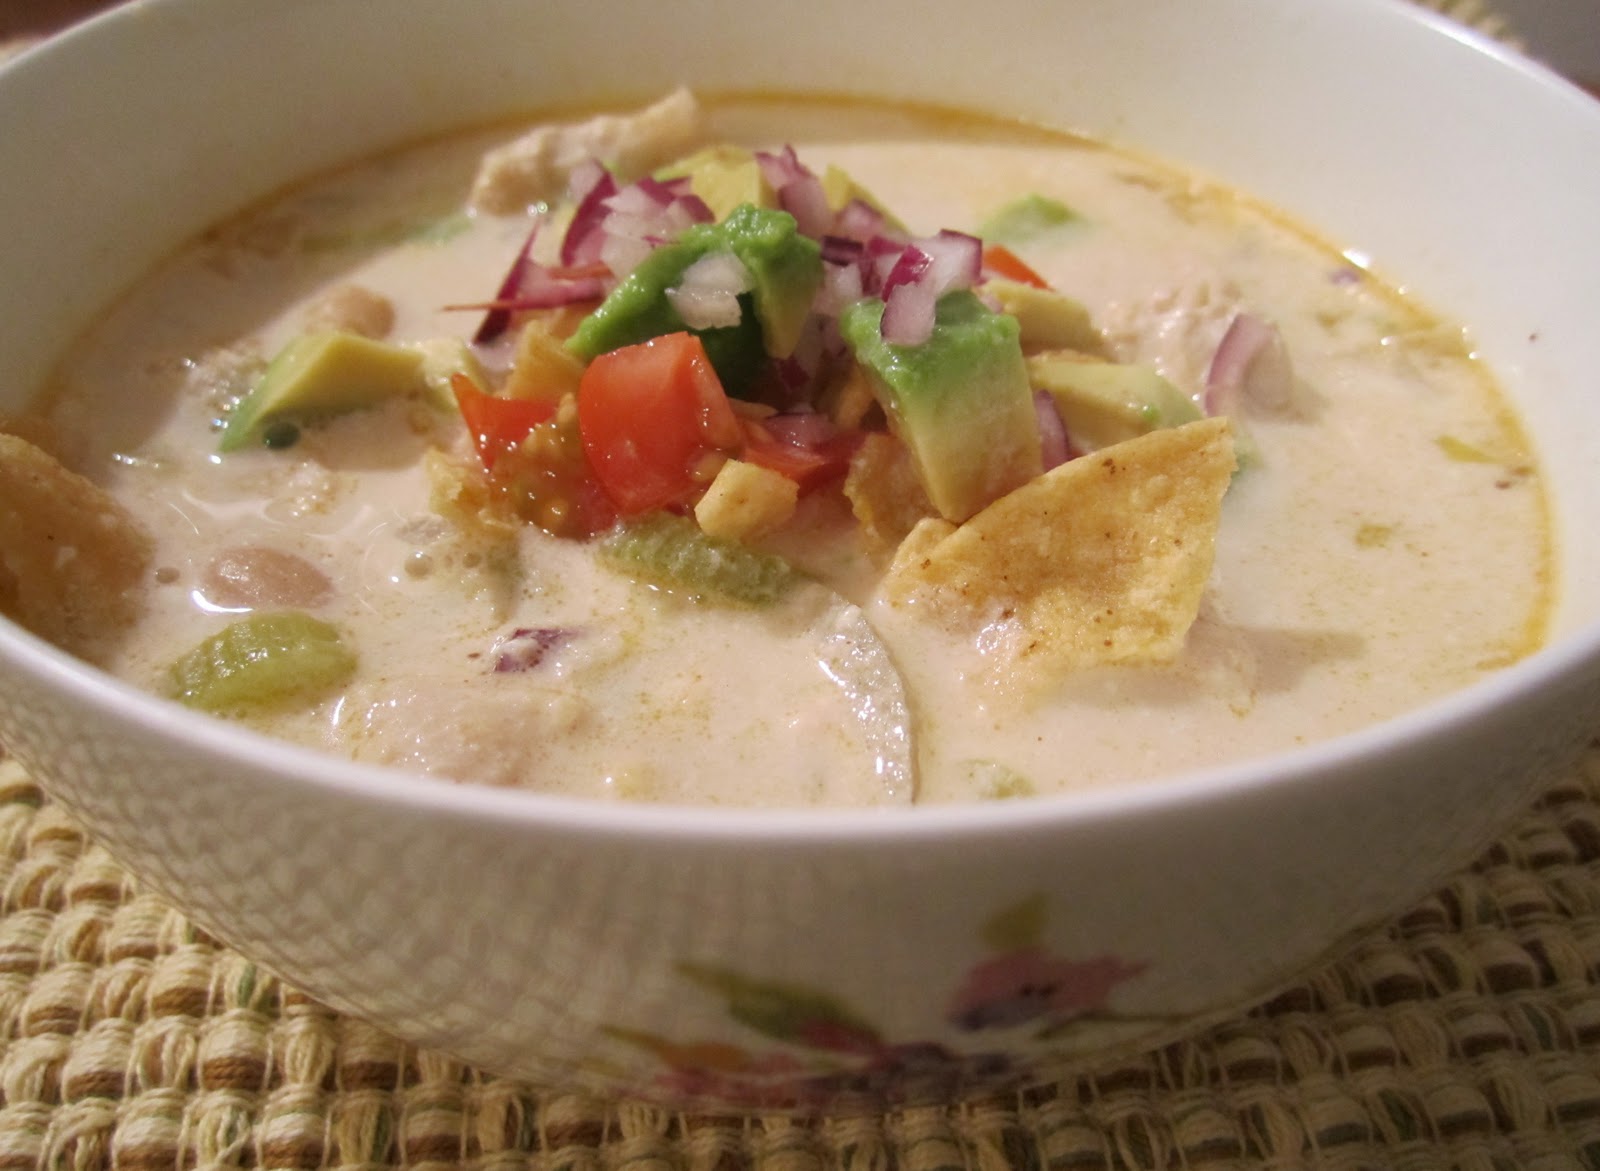
This is basically a hybrid of white chicken chili and tortilla soup.  The result was delicious and satisfying. Warm and fresh at the same time.  Take the time to make the garnishes.  The fresh bite, color and flavor are a tantalizing foil to the creamy broth, chicken and white beans.  They take the soup from really good, to fantastic!  We all agreed on that.  This soup is easy enough for a weeknight, but good enough to share with friends.  A nice winter meal to warm you up without weighing you down! 


At serving time, place a small pile of 5-6 tortilla chips in the bottom of each bowl, top with shredded sharp white cheddar cheese, ladle the hot soup over all then garnish with fresh avocado, chopped tomato and chopped red onion or scallions and a couple more crushed tortilla chips, if you wish.

White Chicken Tortilla Soup
A recipe from The Irish Mother


3 boneless chicken breast halves (approx 1 pound) or 1 small rotisserie chicken, meat removed and shredded
1 tablespoon olive oil
1 small onion, diced
1 stalk celery, diced
1 clove garlic, minced
2 14 ounce cans chicken broth
2 15 ounce cans cannellini or northern white beans, drained
1 cup frozen corn
1 4.5  ounce can chopped green chilies, do NOT drain
2 teaspoons salt
1/2 teaspoon black pepper
3/4 teaspoon chili powder
8 ounces cream cheese, softened


Garnish:


1 medium size bag of good tortilla chips
1 1/2 cups shredded sharp white cheddar
1/2 cup finely chopped red onion or sliced scallions
1/2 cup finely diced tomato
1 ripe avocado, diced 
1 tablespoon fresh lime juice (sprinkle on avocado, to prevent browning)


Cut chicken into small, bite-size pieces.  In a large skillet on med-high, saute chicken in one tablespoon olive oil.  towards end of cooking, add onion and celery.  For last minute or two, add garlic.  Remove from heat.


Pour chicken broth into a large stockpot.  Add cooked chicken.  Simmer for 1/2 hour to tenderize the chicken (unless you used rotisserie, then you can skip this step.)   Add remaining ingredients except for cream cheese and garnishes, bring to a boil, then simmer for 1/2 hour.  A few minutes before serving, place cream cheese in a bowl and microwave for 30 seconds to melt it.  Whisk melted cream cheese into soup.  Heat for a few more minutes.


Place a small pile of tortilla chips in the bottom of each bowl.   Top with a small handful of the cheddar cheese.  Prepare garnishes.  Ladle soup into bowls.  If desired, crush a couple more tortilla chips over soup then sprinkle on some tomato, avocado and onion.  Enjoy!

Wednesday, January 4, 2012

Cinnamon Swirl Scones

"Cinnamon bites and kisses simultaneously."
~Vanna Bonta
You know, some days I just wake up jonesing for scones.  Nothing else will do.  Thank goodness they're so quick to make.  Easy to carry, not as messy as a sticky-bun, not greasy like a doughnut, light and flaky (if made right,) and not too sweet.  Equally great for grab-and-go breakfasts on the way to work as for leisurely Sundays while working the NY Times crossword.  During my travels last week, I brought scones in my carry-on and that delicious portable treat just about made me feel like I was in first class...then my knees bumped into the seat in front of me and I woke up, but that's another story.

This is a recipe I came up with after being unable to decide between making biscuit cinnamon rolls and scones dusted with cinnamon sugar.  Rolling the scone dough with a cinnamon sugar filling elevated them from OK, to Oh Yeah!  Feel free to shape these the night before, keep covered in the fridge, and bake in the morning.  They are best super-fresh!  These are not my absolute favorite scones, but they are the easiest and I always have the ingredients on hand.  But come 6 months, when local blueberries ripen, Make-Ahead Blueberry Scones are tops!


Cinnamon Swirl Scones
A recipe from The Irish Mother
makes 6-8 scones

2 cups sifted flour
2 teaspoons baking powder
½ teaspoon baking soda
3 tablespoons white sugar
¼ teaspoon salt
½ cup cold butter
1 egg
½ cup buttermilk
2 tablespoons softened butter
¼ cup brown sugar
1/2 teaspoon cinnamon

Preheat oven to 400 degrees.  In a large bowl, stir together flour, baking  powder, baking soda, sugar and salt.  Cut in cold butter until the mixture resembles coarse crumbs.

In a small bowl,  beat egg with buttermilk; add to flour mixture folding just until mixture clings together (the key to a tender scone is to avoid over mixing the dough). 

Turn dough out onto a floured board and with floured hands pat into a 12-inch circle.  Spread with the 2 tablespoons of softened butter.  Mix brown sugar with cinnamon and sprinkle all of this over the butter.  Roll dough from the outer  edge (all the way around) towards the middle (you will end up with a ball of dough).  Turn dough over on the floured board and pat into an approx 8-inch circle that is about an inch thick.  With a large sharp knife, cut into 6 – 8 wedges.

Brush with milk and sprinkle with cinnamon sugar.

Bake for 10-12 minutes.  Serve warm.

Tuesday, January 3, 2012

Crispy Garlic Chickpeas

"Be always at war with your vices, at peace with your neighbors, and let each new year find you a better man." 
~Benjamin Franklin
Whoa.....I'm having a hard time getting back in the swing of things.  The holidays were an awesome sprint of family,  friends, food and celebrations, culminating with the beautiful wedding of my son Curtis and his sweet and gorgeous bride, Noelle.  We had an amazing  time in Milwaukee with his new in-laws.  I saw wee hours on the clock I haven't seen since my college days and kept going  on  pure adrenaline for  the last few days of 2011!  

Excuse my absence, but WOOOO! I needed a couple days to recover before jumping back on the blog-horse. Here's a quick recipe that I've wanted to try for months now.  It was perfect to ease back into things.  Yes, I'm late to this party, having spotted these on half  a dozen other blogs, but they were still worth sharing because most of the people I know haven't gotten into them yet.  YET being the operative word.  I wish I hadn't waited so long.  SO EASY - SO GOOD - SO GOOD FOR YOU!  Okay, I'll stop yelling now....but this is a snack to get excited about.  Put down the cookie and pick up the chickpea.  You won't regret it.  

Thanks to Jaden Hair of the blog, Steamy Kitchen for my introduction to them.  My first guinea-pig to try them, Audrey, loved  them and she and I polished off 2/3 of the batch in about 5 mins.  They shrink when you roast them, so one 15-ounce can of beans yielded a bowl-full that would be a good snack for 2 or 3 people.  You could roast 30 ounces of beans on a cookie sheet.  They would make a great snack for the Super-bowl and your guests would appreciate the healthy alternative.

Crispy Garlic Chickpeas

1 15.5-ounce can of chickpeas
1 tablespoon olive oil
Garlic salt
garlic powder
onion powder
black pepper

Preheat oven to 400 degrees F.  Pour can of beans into a colander and rinse with cold water.  Pour beans onto a double layer of paper towels.  Use another paper towel to roll over the beans, drying them well.  Pour beans onto a cookie sheet.  Drizzle olive oil over them and roll them all over with your hand.  Sprinkle with garlic powder, onion powder and black pepper, about 1/4 teaspoon each.

Bake for 30-40 minutes until they have shrunken and browned.  Keep an eye on them at the end to make sure they don't burn.  Let cool for 10 minutes, then watch them disappear!

Thursday, December 22, 2011

Quick Christmas Braid

"Christmas waves a magic wand over this world and behold, everything is softer and more beautiful."
~Norman Vincent Peale
This is a double recipe, shaped slightly differently than Nana's recipe indicates

A few posts back I started poking around in my Great Grandmother Hook's recipe box.
This recipe card caught my eye.
Great Grandmother Hook is the little girl on the right, circa 1894


As far back as I can remember, we used to go to my grandmother's house at 11 a.m. on a Christmas morn.
Me and Nana, Christmas '83, her last one
This Christmas braid, made by Nana Hook, was always there.  It was always braided into a ring and decorated with red and green cherries and pecan halves.  We would start the festivities with a slice and a teacup of eggnog.  I was shocked and sort of pleased to see that it actually starts with frozen bread dough.  That was rather progressive for back then, but Nana would have been in her eighties and early nineties, so I bet that convenience made all the difference.  You never would have guessed.  You need to let the frozen dough thaw either overnight or for 4 hours in a warm spot in your house.  I wouldn't call it quick, but I sure would call it easy!  
Viola (Nana) Hook 1927
The recipe called for a 1 pound piece of frozen bread dough to be thawed thoroughly, rolled out 12 inches square, cut into 3 strips, spread with filling, dough sealed over filling, then braided.  I doubled the recipe and found it MUCH easier to roll the dough into a 13x9 in rectangle, spread with filling, make one big roll, seal in a ring and then cut with scissors, as shown here.  I'll give you the recipe as she wrote it.  It makes a small braid, which you can also shape into a ring.  It's a pretty easy recipe for a Christmas tradition that will leave an impression.  It sure did for me!

Quick Christmas Braid (or Wreath)
Viola Hook 1892-1984


One 1-pound loaf of frozen bread dough
2 tablespoons butter, softened
1/4 cup brown sugar
1/2 teaspoon cinnamon
1/4 cup chopped pecans
1 cup sifted confectioner's sugar
4 or 5 tablespoons milk
red sugar
pecan halves and maraschino cherry halves for decoration


Thaw dough thoroughly [in an oiled bowl, covered with plastic wrap, either overnight or for 4 hours].  Roll


 12 inches square.  Cut into 3 equal strips.  Spread butter down center of each strip.  Combine brown sugar, cinnamon and chopped pecans.  Sprinkle this mixture over butter down center of each strip.  Bring dough around filling and seal edges to form 3 ropes.  Place on a greased cookie sheet and loosely braid.  [Either leave as a strip, or shape into a ring; your choice]  Let rise until double in bulk, about 30 minutes.
Bake at 375 degrees for 30 - 35 minutes.  Cover loosely with foil during last few minutes to prevent over-browning, if necessary.  Cool completely.


Combine confectioner's sugar and milk, adding milk a little at a time until icing is the right consistency to drizzle.  Drizzle icing over cooled braid.  Decorate with pecan and cherry halves and sprinkle with red sugar.  Enjoy!

Sunday, December 11, 2011

Roasted Root Vegetable Salad with Horseradish Vinaigrette

"The beet is the most intense of the vegetables.  The radish, admittedly, is more feverish, but the fever of the radish is a cold fire, the fire of discontent, not of passion.  Tomatoes are lusty enough, yet there runs through tomatoes an undercurrent of frivolity.  Beets are deadly serious."
~Tom Robbins

I love Thanksgiving, don't get me wrong...but after a week of turkey, turkey leftovers and an enormous vat of turkey soup, the Mister and I were ready for some bold flavors.  This salad fit the bill perfectly.  We had it alone on a bed of chopped romaine (in lieu of arugula) as a light supper, but it would make a nice accompaniment to a roast beef dinner.  That the vegetables can be roasted hours ahead of time makes it a wonderful side dish during the holidays when oven space is at a premium.  We were crazy for this, but had a disagreement regarding the addition of pears.  The Mister loved them, but I thought I may have preferred the dish solidly savory.  You can decide for yourself.  
This recipe is inspired by one that appeared in Southern Living a year ago.  That one used sweet potatoes, parsnips and beets.  My version uses beets, turnip, carrot and cipollini onions, along with chopped pears, chopped smoked almonds and Gorgonzola cheese.  Their horseradish vinaigrette was brilliant though, and my only tampering was to add a teaspoon of honey. 
If you are unused to handling fresh beets, here is a tip.  You should prepare them separately and roast them on their own baking sheet.  You may want to wear dish-washing gloves while you peel them and chop them, and keep them away from the other vegetables or they will bleed all over everything and make all a homogeneous red, which takes away from the pleasing colorful look of the dish.  
The other vegetables can all be roasted together on a second baking sheet.  Set them aside at room temperature for up to 3 hours and assemble the right before serving.  We really loved this dish.  Even though I made it last week, we are ready to have it again.  It is a symphony of flavors that all make sense together (with or without the pears) and make your palate sing!  

Roasted Root Vegetable Salad with Horseradish Vinaigrette
Serves 2-3 as a main dish salad, or 6-8 as a side dish

1 medium turnip (about 1 pound) peeled and chopped into bite-size cubes
3 large carrots (about 3/4 pound) sliced into 1/2 pieces.  If they are very big, slice them in half.
3 or 4 large fresh beets, peeled and chopped into bite-size cubes
12 - 15 small cipollini onions, peeled
3 tablespoons olive oil
1 teaspoon kosher salt, divided
1 teaspoon coarsely ground black pepper
1 chopped pear
1 tablespoon fresh lemon juice 
1/3 cup crumbled Gorgonzola cheese
1/3 cup smoked toasted almonds, roughly chopped
1 small bag of arugula, mescalin greens or 1 head of romaine, chopped
Horseradish Vinaigrette (recipe follows)

Preheat oven to 400 degrees F.  Line 2 baking sheets with aluminum foil.  Peel and chop the beets, then toss in a bowl with 1 tablespoon of olive oil, half the salt and half the pepper.  Spread on one of the baking sheets.  Clean surfaces and bowl, then toss the remaining vegetables in the bowl with the remainder of the olive oil, salt and pepper.  Spread on the second baking sheet.  Place both in the oven and bake for 50 minutes, rotating the trays halfway through roasting time.  Test one of the larger chunks to make sure the vegetables are tender before you remove them.  Set aside and let cool completely and for up to 3 hours.

Assemble salad:
Right before serving, slice or chop unpeeled, cored pear as desired.  Toss with lemon juice.
Place vegetables in a large bowl, add pears.  Drizzle with desired amount of dressing and toss carefully.  To serve family style, spread chilled greens in the bottom of a large serving platter or shallow bowl.  Pile vegetables (with pear) on top in a mound.  Sprinkle with Gorgonzola and then nuts.  Serve at room temperature immediately with any additional dressing.

Horseradish Vinaigrette

1/2 cup bottled olive oil and vinegar dressing
1 tablespoon chopped fresh parsley
1 tablespoon prepared horseradish
1 teaspoon Dijon mustard
1 teaspoon honey

Whisk together all ingredients.

If you like this, you might also be interested in:

Thursday, December 8, 2011

Pistachio Cookies

"You must crack the nuts before you can eat the kernel"
~Irish Proverb
I'm excited to share these quick and delicious treats with you!  For the return you get on these cookies in the form of joyous appreciation, their ease of preparation is truly criminal.  From start to finish you can have the entire batch baked and cleaned up in half an hour.  Not kidding.  But when your family and friends taste them and then proceed to inhale them, you may want to double your efforts so you actually have some left for your Christmas cookie tray!

About 6 years ago, in a bout of crazed organization, I decided to type up my mess of a lifetime of collected recipe cards and clippings into a binder.  But last year, when I wanted to make these cookies, I couldn't find the recipe.  Probably because it was under B, for Best Ever, instead of P for Pistachio.  So much for being organized :-/.  Unfortunately, I've had this recipe so long I have no recollection of where it originated.  Over the years, a little tweaking has improved them with the addition of toasted nuts, green food color and almond extract.  Soft and chewy with that adored pistachio ice cream flavor, they are sure to please.  I hope you get a chance to try them.  And if you have an extra minute or two, check out this virtual cookie swap at The Farmer's Wife: http://www.the-farmers-wife.net/2011/12/cookie-swap-party.html

Best Ever Pistachio Cookies
Makes about 30 cookies


1 box white cake mix
1 box instant pistachio pudding mix
1/2 cup shredded coconut
1/2 cup nuts (almond or pistachio), toasted and roughly chopped 
1/2 cup vegetable oil
2 eggs
1/4 teaspoon almond extract
6 drops green food coloring.


Preheat oven to 350 degrees F.  Place first four ingredients into a large bowl.  In a small bowl, stir together the remaining ingredients. Pour contents of the small bowl into the large bowl and stir together until combined. Batter will be stiff.  Drop tablespoons size dollops of dough onto an ungreased cookie sheet about 1 1/2 inches apart.  Bake for 11-12 minutes, until lightly browned.