My Motto

May the muffin rise to greet you, may your friends be always at your door, and until we meet again, warm a single-malt in the palm of your hand and make something homemade for someone you love.

Thursday, July 28, 2011

Coconut Chocolate Chip Cookies

"Sometimes me think, what is love? And then me think love is what last cookie is for.  Me give up the last cookie for you."
~Cookie Monster (Sesame Street)
We've had a record breaking heat wave (like much of the country) this July in New England.  As a consequence, I haven't baked much in recent weeks.  This baking slump is killing me.  Random cravings torment.  The frozen stash has disappeared.  Breakfast has reverted back to cereal (GASP!).  Since today's 85 degrees felt comparatively cool next to last week's 105, I jumped at the opportunity to fire up the oven.  This recipe has been turning around in my mind for days although the bug was planted back in February by Maggie at Vittles and Bits.  When I mentioned the idea to my daughter, she said "DO IT!" and I didn't need much encouragement.  The cookies came out moist, chewy and coco-nutty.  Exactly what this baked-goody-deprived household was Jonesing for.

Chocolate Chip Coconut Cookies
Adapted from a recipe on the blog Vittles and Bits
Makes 2 Dozen Cookies

1 stick butter, at room temperature
2 tablespoons Crisco (or other shortening)
1/2 cup sugar
1/2 cup brown sugar
1 egg
1/2 teaspoon vanilla extract
1/2 teaspoon coconut extract
1 1/2 cups flour
3/4 teaspoon baking soda
3/4 salt
1 1/4 cups chocolate chips
1 cup sweetened flaked coconut

Preheat oven to 350 degrees.  In a large bowl, beat butter and Crisco together.  Add sugars and beat well.  Add egg and extracts and beat on low until combined.  In a small bowl, stir together the flour, baking soda and salt then stir in to the wet ingredients.  Stir in the chips and coconut.

Drop by tablespoonfuls onto cookie sheet.  Bake for 10-12 minutes.

Wednesday, July 27, 2011

Captain's Cut Baked Cod

"Don't tell fish stories where people know you; but particularly, don't tell them where they know the fish."
~Mark Twain 
This is my favorite way to have cod, and it's super quick and easy as well as healthy and delicious!  Every time I prepare it I think "why don't I make this more often?"  Cod is a nice whitefish, but can be bland on it's own, so I like to dress it up with this crumb topping.  You need a couple pieces of white bread for this recipe. Even a hot dog or hamburger roll will do.  Dry it out a bit, then toss it in a food processor or blender to turn to crumbs.  Packaged bread crumbs will not be the same, they are too fine and over-seasoned.  The white bread makes a light and fluffy crumb that compliments the delicate fish.  To the crumbs you add a clove of garlic (minced), 2 tablespoons Parmesan cheese and 3 tablespoons melted butter. Pulse a few times to bring it together and that's all there is to it.   I think next time I may try adding some chopped fresh herbs or lemon zest to the crumbs.  When choosing the cod, fresh and local is best, but you can use frozen if you have to.  Choose nice one-inch thick pieces.  One pound fresh will serve two people generously.  It might look like a lot, but it shrinks a bit as it's cooked.  
My plan this week was to make a big batch of cole slaw (love it!) and have pulled pork sandwiches with cole slaw one night and cod the next, but my pork shoulder was large and took longer to relax than expected.  By 5:30 p.m. it was clear the pork wouldn't be ready, so I switched gears and threw the cod together.  Luckily, it's really easy and is done in half an hour, saving the day! 

Captain's Cut Baked Cod
Serves 2

1 pound of 1-inch thick pieces of cod.
1 cup white bread crumbs
1 clove of garlic, minced
2 tablespoons grated Parmesan cheese
3 tablespoons melted butter
1/2 cup white wine
1/2 teaspoon of paprika (optional)
4 lemon wedges

Preheat oven to 350 degrees.  Take bread out and let it dry out a little.  Butter a 9-inch square baking dish.  Place cod pieces in dish and pour wine over them. Tear bread up and add it to a small food processor or a blender.  Pulse a few times to make crumbs.  Add minced garlic, cheese and melted butter.  Pulse a few more times, then sprinkle crumbs on top of fish.  Dust with paprika, if desired.  Bake for 35-30 or until fish flakes easily in the middle.  Serve with lemon wedges to squeeze over the fish.  

Sunday, July 24, 2011

Chocolate Velvet Cheesecake Ice Cream

"Life is like an ice-cream cone.  You have to lick it one day at a time."
~Charles Shultz


Did you know that July is National Ice Cream Month?  Me neither, until the other day.   My friend Di, of Di's Kitchen Notebook put together an ice cream posting event for today and graciously invited me to submit.  I haven't made ice cream in years, but remember so fondly my grandparents churning out fresh strawberry, peach and chocolate flavors.  The experience of licking the ice cream maker paddles, and the super-fresh taste are still vividly locked in memory!  

A new cookbook of mine, Sarabeth's bakery, included some ice cream recipes that piqued my interest, so this was a good excuse to borrow an ice-cream maker and try my hand at it.  I chose the recipe for chocolate velvet ice cream and decided to throw some cheesecake chunks in it (as if it wasn't decadent enough already!).  This is no ordinary chocolate ice cream.  The recipe is engineered to produce really silky, creamy, luxurious results.  Honey is used for sweetener because it's composition deters ice crystals from forming and the rich chocolate custard does feel velvety smooth on your palate.   You really should make this the day before you plan to eat it.  It starts with a cooked custard that should be completely chilled before you churn it.  Then, the churned ice cream needs to freeze another 3-4 hours.   The result was a perfectly smooth, rich, decadent, intensely chocolate ice cream with welcome little pods of cheesecake.  By the way, I wasn't going to bake a cheesecake for the sake of throwing a few pieces in the ice cream.  I just picked up a slice at a restaurant, threw it in the freezer and cut it up and folded it into the ice cream, after churning, but before the final freezing.

Chocolate Velvet Cheesecake Ice Cream
Adapted from Sarabeth's Bakery

10 ounces good quality semi-sweet chocolate (no more than 65% cacao)
2 cups heavy cream
1 cup whole milk
3/4 cup granulated sugar
1/3 cup orange blossom honey (or other mild honey)
1 teaspoon pure vanilla extract
8 large egg yolks (or 7 jumbo)
1 slice plain New York Cheesecake, frozen and cut into 1/2 to 1 inch pieces

1. Bring 1 inch of water to simmer in a medium saucepan.  Put the chocolate in a wide, heatproof bowl and place it over the simmering water in the saucepan.  Stir until the chocolate is melted and set aside.

2. Pour the cream and milk into a heavy-bottomed medium saucepan and add the sugar and honey.  In a separate bowl, whisk the egg yolks and place them by the stove.   

3.  Heat the cream mixture over medium heat, stirring almost constantly with a silicone spatula to dissolve the sugar, until the mixture is very hot but not simmering.  Gradually whisk the hot cream into the yolks.  Pour this mixture back into the saucepan and place on med-low heat.

4. Cook, stirring constantly with the spatula, being sure to reach the corners of the saucepan, until the custard is thick enough to nicely coat the spatula.  Stir in vanilla.  Cool slightly.  Pour into a bowl and cover with plastic wrap laid directly on the sure (to prevent a skin from forming) and refrigerate until completely chilled, or up to 24 hours.

5. Transfer the chilled custard to an ice-cream maker and process according to the manufacturer's instructions.  Remove paddle and fold in chunks of cheesecake.  Pack into a covered container and freeze for at least 4 hours before serving.

Friday, July 22, 2011

Wineberry Muffins

“Well, I can't eat muffins in an agitated manner. The butter would probably get on my cuffs. One should always eat muffins quite calmly. It is the only way to eat them.”
~Oscar Wilde (1854-1900)
One of my favorite things about summer is the two week period I can walk outside and pick piles of wineberries.
These little beauties are a distant Asian cousin of the raspberry and you can find them all over the Northeast, on the edges of stone walls, meadows, roadsides and basically turning up randomly in weedy places.  They popped up on the edge of our property a couple of years ago (jackpot!).  The berries are in general smaller, shinier and a bit tarter than raspberries, like a cross between a currant and a raspberry.  On the cane, they are hidden in fuzzy little pods that pop open to reveal a golden berry that will ripen to crimson in a few days. 
 They are very delicate and as far as I know, not available commercially.  Since they only last a couple days before spoilage sets in, you should store them in the refrigerator and use them up quickly.  This recipe is almost the same as the blueberry one I use, but I loosened the batter up, so the berries wouldn't be crushed when they're stirred in, and use buttermilk and some lemon zest because the tang and fragrance compliment the berries in these addictive muffins.  Next time you're in New England towards the end of July, keep your eyes open as you travel around rural areas.  If you're lucky, a glimpse of red will catch your eye and you'll soon have handfuls of these little-known jewels of the weeds.  I should add that these are our absolute favorite muffins!  The moist and perfectly sweet crumb makes a great vehicle for the tart berries.

Wineberry Muffins
makes 6 jumbo muffins

1 1/2 cups flour
3/4 cup sugar
1/2 teaspoon salt
2 teaspoons baking powder
1/3 cup vegetable oil
1 egg
1/2 cup buttermilk
1 teaspoon lemon zest
1 cup fresh wineberries

Preheat oven to 400 degrees.  Grease muffin cups with butter or line them with jumbo sized muffin liners.  Combine the first 4 ingredients in a large bowl.  In a small bowl whisk together the oil, egg, buttermilk and lemon zest.  Add wet ingredients to dry ingredients, stir briefly.  Add wineberries before dry ingredients are fully incorporated.  Gently finish stirring until JUST mixed.  Divide batter between the 6 Texas-size muffin cups.  Make topping:

Topping For Muffins

3 tablespoons COLD butter
1/2 cup flour
3 1/2 tablespoons white sugar

Cut butter into a small bowl.  Add flour and sugar and then smash it all together with your fingers until the butter is worked in well, and is crumbly.  Sprinkle mixture over the batter in the 6 muffin cups, dividing evenly and using all of it.

Bake muffins on middle rack of oven for 20 minutes.  They are done if you touch the top and it springs back.  Watch closely so you don't overbake them.

Sunday, July 17, 2011

Key Lime Spritzer Cookies

"If life gives you limes, make margaritas."
~Jimmy Buffet

Twenty years ago or so, Pepperidge Farm marketed Lime Spritzer and Lemon Spritzer cookies.  They used to show up in the grocery store for the summer season only.  There aren't too many packaged cookies I like, but boy, did I look forward to them. Their absence from the shelves in recent years has prompted me to try to recreate them.  You can use key limes to make these, but the fresh ones were pretty expensive, so I used Nellie and Joe's bottled key lime juice and zested a regular Persian lime. These will be a new mainstay in the summer repertoire, for sure.  They were really tender, tart and sweet and just what I was hankering for.  It's always good to keep the Mister happy too.  He just gave them an enthusiastic "10" and said he could pound them like nachos (I better go hide some).

Key Lime Spritzer Cookies
makes 2 dozen cookies

1 1/2 sticks of butter, at room temperature
1/3 cup confectioner's sugar
1 3/4 cup flour
3 teaspoons lime zest
2 tablespoons cornstarch
1/4 teaspoon salt
1/4 teaspoon baking powder
6 tablespoons key lime juice
For coating:
1 cup confectioner's sugar

Preheat oven to 350 degrees.  Line two cookie sheets with parchment paper.  In a large bowl, cream the butter, then beat in the zest and confectioner's sugar.  Measure into the bowl 1 3/4 cup flour, the cornstarch, salt, baking powder and beat well until incorporated.  Quickly beat in the lime juice and then drop teaspoons of dough (you should aim to size them small enough to pop the whole thing in your mouth) onto the lined cookie sheets.  Bake about 15 minutes or until lightly browned on the bottom.
Cool completely.  Place 1 cup of confectioner's sugar into a ziploc bag.  Add a couple cookies at a time and shake gently to coat them completely.  They are tender and will break easily, so don't add too many to the bag at once.  Store at room temperature in a sealed container (but they will probably be gone before they have a chance to get stale!).

Wednesday, July 13, 2011

Asparagus Risotto with Shrimp

"You know, when you get your first asparagus, or your first acorn squash, or your first really good tomato of the season, those are the moments that define the cook's year. I get more excited by that than anything else."
~Mario Batali
Yes, I know asparagus is a spring vegetable and recipes abound in April and May, so I'm a bit late to the party here.  But that's fashionable, isn't it?  I can find good asparagus all summer at my neighborhood market. It may not be local, but it's good.  That's lucky for us, because this recipe makes such a nice, light summer meal.  If risotto is on the menu at a good restaurant, I usually choose it as a side dish,  but in this instance I added the shrimp and let it shine as a main course.  I realize seafood risottos don't usually include cheese, but we like it this way.  All of us here prefer to eat a little lighter in the summer and this dish was fresh and delicious, but had enough substance to really satisfy.  The Mister said it was "freaking awesome."  What more can I say?  The recipe is adapted from one by the Gourmet Trading Company.
A few words about risotto.  You can't rush it.  It needs to be stirred gently and almost constantly, which creates the creamy consistency.   It also should take at least 30 minutes to absorb the broth.  If it's going too quickly, turn the heat down.  You don't want to end up with crunchy risotto.  It can't sit around either, because it will continue to cook and firm up.  You need to serve it immediately.  The little extra time and care are well worth it!

Asparagus Risotto with Shrimp
Serves 3-4

1 pound fresh asparagus, cut on bias, 2" long.
5 cups chicken broth
2 tablespoons extra virgin olive oil
1 onion, finely chopped
4 garlic cloves finely chopped
1 1/2 cups aborio rice
1 cup dry white wine
1 pound peeled, deveined raw large shrimp
sea salt and fresh ground black pepper
3/4 cup Parmesan cheese
1 tablespoon minced fresh herbs, such as basil, chives and parsley

Warm the broth in a saucepan over medium heat.  In a large saute pan, heat the oil over med-high heat.  Saute onion and garlic briefly.  Add the aborio rice and cook, stirring constantly, for about 2-3 minutes.  Add the wine and cook until the liquid is absorbed.  Add the broth, about a 1/2 cup at a time, stirring constantly and waiting until it is absorbed before adding more.

Meanwhile, in a saute pan, heat 2 tablespoons of olive oil.  Saute asparagus about 2 minutes until bright green.  Add shrimp and cook for 1 more minute.  When the risotto only has 1/2 to 1 cup of broth left to be stirred in, add the asparagus and shrimp and let finish cooking in the risotto as you stir in the last of the broth.  When the broth is completely absorbed, season to taste with salt and pepper and stir in the Parmesan cheese.  Serve immediately.

Friday, July 8, 2011

Blackberry Jam

"The blacker the berry, the sweeter the juice."
~Proverb
I am enamored with the blackberry.  This isn't a bad thing, since they're one of the healthiest snacks on the planet, containing almost the highest antioxidant levels of all fruits tested.  Luckily for us, you can find them year round in the market these days.  I buy some almost every week and when I'm trying to be good, I'll grab a handful to snack on in the afternoon when I'm jonesing for something sweet.  
My love for them goes WAY back to when my Gramma Murphy had an old grove of blackberry brambles on the side of her property.  We picked baskets-full that she would magically turn into the BEST blackberry jelly, which was my all time favorite on a peanut butter sandwich.  These days I prefer the jam version and that's the recipe I'm sharing with you.  

If you want to make this recipe, take care in choosing your blackberries.  Pick them locally, or buy from a farmer's market for the best flavor.  If you have to purchase them from a market, taste a couple first to make sure they are both tart and sweet.  I once made the mistake of buying them in bulk from a HUGE discount chain, because I couldn't believe how inexpensive they were.  Rushing home to make jam, I dreamed of all the jewel colored jars full of dark delectable jam.  I soon woke up.  Here's the thing; the berries were probably imported from Tim-Buck-Too and didn't have much flavor, and of course, that lack of flavor translated to the jam.  Learn the lesson from me.  All berries are not the same...taste them!
Blackberries have lots of natural pectin, so your jam will set pure and naturally!

Blackberry Jam
From 250 Home Preserving Favorites by Yvonne Tremblay
(makes about 5 8-ounce jars)

8 cups blackberries (about 2 lbs or 1 kg)
1/2 cup water
1/4 lemon juice
4 cups granulated sugar

1. In a large, deep, heavy-bottomed pot, combine blackberries, water and lemon juice.  Bring to a boil over high heat.  Reduce heat and simmer, stirring occasionally, for 5 minutes.  Bring to a full boil over high heat, stirring constantly.

2. Add sugar in a steady stream, stirring constantly.  Return to a full boil, stirring constantly to dissolve sugar.  Reduce heat to medium-high and boil rapidly, stirring often and reducing heat further as mixture thickens, for 12-15 minutes or until thickened.  Test for setting point.  I keep 3 saucers in the freezer for this.  You spoon a little on the cold plate, wait a minute and then nudge it with your finger.  
See the wrinkles in front of my finger?  This jam is set.
3.  If it wrinkes, it is set.  Remove from heat and skim off any foam.

4. Ladle into sterilized jars to within 1/4 inch of rim; wipe rims.  Apply prepared lids and rings; tighten just to finger-tip tight.

5. Process jars in a boiling water canner for 10 minutes.  Transfer jars to a towel-lined surface and let rest at room temperature until set.  Check seals;  refrigerate any unsealed jars for up to 3 weeks.

Tuesday, July 5, 2011

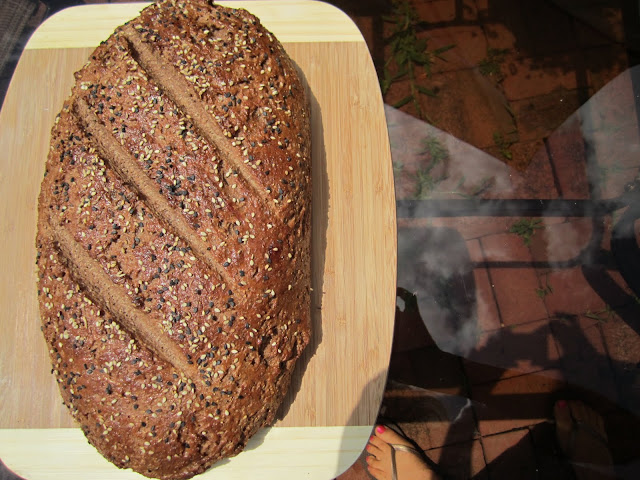
Whole Grain Dark Seeded Rye

"I keep picturing all these little kids playing some game in this big field of rye and all.... If they're running and they don't look where they're going I have to come out from somewhere and catch them. That's all I'd do all day. I'd just be the catcher in the rye and all. I know it's crazy."
~J. D. Salinger
This is such a great bread recipe.  I love home-baked bread and have been trying more and more whole grain recipes.   You have to have a good one though, because whole-grain dough is a little trickier.  For instance, it requires more liquid because the grain absorbs it.  They take a little longer to rise sometimes too, that's why I'm trying them in the summer while the house is warm and encourages rising.
Two weeks ago I tried a new wheat bread recipe, and although it came out good, it was not GREAT so I didn't share the recipe with you.  I'll only share things here that get me excited, and this dark rye fit the bill.
It was moist, had a great flavor and crumb, stayed fresh for days and toasted well, too.  A simple slice with butter is a surprising treat and there is nothing like a ham and Swiss cheese sandwich on fresh rye.  The only thing better than spending a beautiful day at the beach or the lake is having good food while you're there!  Have bread, will travel!
The recipe was adapted from one from Hodgson Mill and I used their stone ground rye and vital wheat gluten to make it.

Dark Seeded Rye


3 1/2 cups Hodgson Mill Rye Flour
2 1/2 to 3 1/2 cups bread flour
2 tablespoons Hodgson Mill Vital Wheat Gluten
2 packages active dry yeast (equals 2 tablespoons)
2 cups warm water (not to exceed 110 degrees F)
1/4 cup brown sugar
1/4 cup molasses
3 tablespoons cocoa powder
1 1/2 to 2 tablespoons caraway seed (optional)
2 teaspoons salt
1/4 cup butter
1 beaten egg
1 tablespoon sesame seeds
1 tablespoon black sesame seeds


Measure water into a large bowl.  Add brown sugar and yeast.  Proof yeast for 5 minutes.  Add molasses, rye flour, vital wheat gluten, cocoa and caraway seeds.  Beat well, then let sit for ten minutes.  Mix in melted butter and salt.  Mix in 1 cup of bread flour.  Knead in enough of the remaining bread flour to make a soft dough and knead for 8 -10 minutes.  Place dough in an oiled bowl, cover with a damp cloth and allow to rise for one hour or until doubled.  Shape dough into an oval loaf and place on a greased cookie sheet, [or cut into two pieces, shape into loaves and place into greased loaf pans] cover with a damp cloth and allow to rise for an hour or until dough has doubled in bulk.  
Brush dough with beaten egg, sprinkle with sesame seeds, make 3 diagonal slashes in the top of the dough with a sharp knife and  bake in a 400 degree (F) preheated oven for 25 to 30 minutes.  Immediately remove from pans and cool on a wire rack.

Friday, July 1, 2011

Blackberry Cordial

"The Earth's crammed with heaven. And every common bush afire with God; but only he who sees takes off his shoes...the rest sit around and pluck blackberries."
~Elizabeth Barrett Browning


How about a sunny little cocktail for your next gathering?  I love blackberries and this was a simple concoction that took no time at all to throw together and just a bit of foresight for it's resting period.  The finished result was light, refreshing, and dangerously smooth.   As one guest said "you could drink 47 of these before you knew what hit you!"  
Blackberry Cordial

Mash 2 cups of berries with 1/2 cup of sugar in a quart mason jar.  Fill jar 3/4 full of vodka and store in a dark place for 3 weeks, then strain.  Mix one part blackberry vodka with 2 parts tonic water over ice with a splash of lime juice.  Cheers!