My Motto

May the muffin rise to greet you, may your friends be always at your door, and until we meet again, warm a single-malt in the palm of your hand and make something homemade for someone you love.

Thursday, March 24, 2011

Cottage Pie and a Cookbook Giveaway Winner!

"A cabin with plenty of food is better than a hungry castle."
~Irish Saying


I had big plans for March.  You know, the cookbook giveaway, lots of Irish cooking and blog posts.  I was really going to have fun with it, but sometimes life has a way of interfering with the blog.  Oh yes, and then last week Scott and I went to Florida.  Now that's some good interference.

Cottage pie is something I've been making forever.  For many years I just whipped it up with no recipe, using whatever I had around.  It is, after-all, a meal of economy.  Well, about two years ago we sat down to eat it and just looked at each other and said "Whooaaa."  It was remarkably better than usual, so I immediately wrote down everything I did.  And there you have it!  If you're looking at this saying to yourself, wait a second, isn't that Shepherd's pie?  No.  No, it's not.  But here in the U.S., folks are in the habit of calling it that.  Shepherd's pie, as the name implies, is traditionally made with lamb, whereas cottage pie is made with beef.  Whatever you call it, call it GOOD!

Oh yes, The Country Cooking of IRELAND cookbook giveaway.  I didn't forget.
AND THE WINNER IS: The wonderful @CoastalKate! Kate's winning entry was a tweet!  The book is in the mail, Kate.  You should get it by Monday!

Cottage Pie


Mashed potato topping:
6 small fist size potatoes, peeled and cut in half
3 tablespoons butter
1/2 cup sour cream
1/2 teaspoon salt
1/2 teaspoon pepper
1 cup cheddar cheese (optional)
1 tablespoon minced fresh parsley (optional)


Beef filling:
1 pound ground beef
2 teaspoons vegetable oil
1 medium onion, chopped (should equal about 1/2 cup)
1 medium carrot, chopped (should equal about 1/2 cup)
1 can (15 1/2 ounces) beef consommé 
1 cup frozen peas
1 packet Lipton (dry) onion/mushroom soup mix
1/3 cup ketchup
2 tablespoons Worcestershire sauce
1 teaspoon Dijon mustard
1 cup shredded sharp cheddar cheese


Boil potatoes for 30 to 40 minutes until tender if poked through with a knife.  Drain.  Add remaining ingredients and whip with electric beaters until fluffy.  Set aside.


Preheat oven to 350 degrees.  In a large skillet, heat oil on medium high and saute onion and carrots for a couple minutes.  Add ground beef and cook, breaking apart clumps, until thoroughly browned.  If there is fat, drain it off.  Add beef consommé, peas, soup mix, ketchup, Worcestershire, mustard and stir.  Pour into a buttered casserole or large pie plate. Top with mashed potatoes and score with a fork.  Bake 30 minutes.  Top with remaining cheddar if desired and return to oven just until cheese melts (5-10 mins).

Tuesday, March 8, 2011

Rye-Onion Rolls AND Slow-Cooker Corned Beef, Finished with a Mustard Glaze.

  "Anytime a person goes into a delicatessen and orders a pastrami on white bread, somewhere a Jew dies."
~Milton Berle

In true stereotypical fashion, I absolutely LOVE corned beef (and cabbage for that matter), but let's face it, it's not glamorous.  In fact, you could probably run over it with your car a few times and leave it in the yard for  a week, and it would still come out tasty.  
You simply have a lot of leeway with it, as far as cooking time, unlike a prime rib which could be ruined by 15" too many in the oven.  Everyone seems to have their own favorite way to prepare it and I'll share mine with you (bottom of post), but what I'm REALLY excited about is these rye-onion rolls to serve with it, or for sandwiches with the leftovers.  I was going to bake some straight-up seeded rye, but when I picked up the  bag of Hodgson's Mill rye flour, there was a recipe for onion-rye dinner rolls.  I tweaked it some and included instructions to form knots, because the recipe said only "cut rope into 1 1/2 inch pieces and shape into buns."  Hmmmmm, I guess you could do whatever you want with those pieces, but I'm giving you the knot-making method from The Breadbaker's Apprentice, which forms a very appealing bun.  It's easy!
As they were baking, the aroma emanating from kitchen was simply intoxicating.  After school, Audrey had one.  In-between bites, she was mumbling appreciatory adjectives, and then stated "OMG Mom, that was so amazing, I have to have another one!" 
Holders for corned beef, pastrami, ham or hamburgers, warm from the oven, or toasted with butter, these rolls may have bumped bagels from the top of my Toasted Treats list.  And as an added bonus, they are nutritious, the rye flour being whole grain, and just a touch of honey in the recipe.
And remember, from now until St. Patrick's Day, simply comment on any post for an entry to win The Country Cooking of IRELAND!

Rye-Onion Rolls

1 cup milk
2 tablespoons honey
1 teaspoon salt
3 tablespoons butter
2 pkg active dry yeast
1/2 cup warm water
3 cups white flour
2 tablespoons caraway seeds
6 tablespoons minced onion
1 - 1 1/4 cups rye flour
1 egg
2 teaspoons water
1 tablespoon poppy seeds 

Scald milk; combine it in mixing bowl with honey, salt, and butter.  Stir well; cool to lukewarm.  Dissolve yeast in the lukewarm water; combine with milk mixture.  Add white flour and beat vigorously 1 minute.  Add caraway seeds, onion, and enough rye flour so dough is firm enough to knead.  Turn dough onto floured surface; knead 8 minutes.
Place in oiled bowl, turning once to coat evenly.  
Cover and let rise in warm place until dough is doubled (one hour).
Punch down dough, cut in half and roll each half by hand into a long rope about 1 1/2 inches think.
Cut each rope into 6 3-inch pieces.
Roll each piece into a rope about 12 inches long.
Tie rope into a knot, leaving the ends hanging out a little.
Tuck top end (on right in photo) underneath and bottom end (sticking out on left) over top and into hole in middle of roll.
Place 2 inches apart on an oiled baking sheet (or on parchment paper).  Cover with towel and let rise until doubled.
Preheat oven to 400 degrees.  Beat the egg with water and brush the tops of the buns.  Sprinkle with poppy seeds.  Bake 12-15 minutes or until nicely browned.  Yield: 12 rolls.

My Favorite Way to Cook Corned Beef:
In the slow-cooker all day, then finished in the oven with a glaze. The glaze recipe comes from my Sister-n-law, Joy Murphy.

3-4 lb. corned beef
water
1/2 cup chopped onion
2 garlic cloves
2 bay leaves
a few peppercorns
2 teaspoons brown sugar
1/2 teaspoon mustard seed (or, if your corned beef comes with pickling spices, throw them in)
1 head cabbage, cut into 6 wedges.

Place corned beef in slow cooking pot.  Barely cover with water.  Add the rest of the ingredients, excluding cabbage.  Cover and cook on low 10-12 hours.  Turn to high for the last two hours, adding cabbage for the last half hour.  Remove corned beef and place on a baking sheet.  Leave cabbage in slow cooker, covered, while you glaze the corned beef.

Preheat oven to 350 degrees.  In a small saucepan, mix together:
1/2 cup brown sugar
1/4 cup vinegar
1/4 cup mustard
1/4 teaspoon onion powder
1/4 teaspoon garlic powder
Heat on medium-high until sugar melts.  Remove from heat.  Pour glaze over corned beef and use a brush to cover all surfaces.  Bake 30 minutes, brushing with glaze occasionally.
Serves 4.  Serve with rye-onion rolls, cabbage wedges and boiling potatoes (cooked separately).


Monday, March 7, 2011

Leek Pie

“If Leekes you like, but do their smell dis-like, Eat Onyons, and you shall not smell the Leeke; If you of Onyons would the scent expell, Eat Garlicke, that shall drowne the Onyons' smell.”
~Dr. William Kitchiner(1775-1827) , The Cook's Oracle (1817)


I love leeks.  They remind me of spring.  Cutting them up reveals a spectrum of fresh shades of green hidden inside.  I considered adding some bacon to this pie, since I had some that I wanted to use up.  I'm glad I didn't.  The subtle flavor of the leek was just perfect starring all alone in the creamy base.  The Gruyère didn't  overpower the leeks, but the bacon would have.  

This is a sample recipe from The Country Cooking of IRELAND, the book that I'll be shipping to one lucky winner at the end of the month.  You need only comment for an entry.  The leek pie is the creation of Kevin Driver, the chef at Kelly's Resort Hotel and Spa on the Sea in Rosslare, County Wexford.  

I halved the recipe, since there was only Scott and I around for dinner last night, but I'll give it to you the way it was presented.  It says it will serve 6, but we had no problem polishing off the half-size pie.
We LOVED it and I'll be making it again soon.  It was easy, too.  Pepperidge Farm frozen puffed pastry never disappoints.  


Leek Pie

3 tablespoons of flour
3/4 cup butter, softened
4 cups chopped leeks (about 4, whites only)
1 cup heavy cream
1/2 lb of Gruyère cheese, grated
1 1/2 lbs of puff pastry, thawed
1 egg, beaten

Preheat oven to 400 degrees.  In a very small bowl, work flour into 1/3 of the butter, using a fork, creating a Beurre Manié.  Melt remaining butter and add the leeks.  Cook for 15 to 20 minutes, until softened.
Stir in the Beurre Manié and cream and bring to a boil, stirring.  Remove from heat to cool.  When it is at room temperature, stir in the cheese.  Cut two 10 inch disks from the dough.  Put one on a cookie sheet, brush some egg over the surface.  Pile leek mixture in the middle and spread to within a 1/2" of the edge.  Tope with remaining disk.  Press edges together and crimp to seal.  Brush all over with beaten egg and then cut a few X's in the top.
Bake 10 minutes at 400 degrees, then reduce the heat to 325 degrees and cook for 20 minutes longer.
Serve immediately.  Serves 6.

Wednesday, March 2, 2011

Rustic Blackberry Tarts

"O, blackberry tart, with berries as big as your thumb, purple and black, and thick with juice, and a crust to endear them that will go to cream in your mouth, and both passing down with such a taste that will make you close your eyes and wish you might live forever in the wideness of that rich moment."
~Richard Llewllyn (How Green Was My Valley)
This month I am celebrating my Irish heritage and posting only Irish recipes.  This one goes back to my childhood personally, but hundreds of years historically.  
Blackberry brambles are one of the most familiar bushes in Ireland. They have been growing in Europe for thousands of years.  Their long rambling stems arch over walls and clamber along hedgerows, armed with prickly thorns that take root wherever they touch the ground. Their prevalence allows for thrift, so it is no wonder they are popular in jams, chutney, compote, crumbles, pies and tarts!  Very often they are mixed with apples, although I prefer them on their own.  These little tarts left a taste imprint I've never forgotten.  Simple and wholesome.  I also make very pretty refined tarts with a cheesecake-like filling and perfect glazed berries standing like soldiers around the edge.  They make a pretty picture, but it is these humble free-form tarts of my childhood that I crave.   

My grandmother Murphy had a nice grove of blackberry bushes where we would pick on an August day.  They were so prolific, we could fill baskets in no time.  She warned me that we need to sing while we pick to scare the snakes away!  
This was she and I after a strawberry picking outing, but you get the picture.  Only women of a certain generation will remember that Dorothy Hammil haircut I'm sporting.
Her blackberry jelly was my favorite.   For trips to the beach, she would always pack peanut butter and blackberry jelly sandwiches.  They tasted like heaven to me.  I have yet to find a source for a good blackberry jelly or jam that tastes like hers.  I'll be putting some up this summer.
The tarts I made at home with my mother.  Little free-form tarts because the wild berries I would pick in the neighborhood would only yield one or two cups at a time.  Never enough for a whole pie, but you could get a couple delicious tarts out of them.  You can use little tart shells or ramekins, but I prefer the free form shallow tart shell.  You could also double the recipe and make a straight-up, two-crust blackberry pie, or double the filling only and make a one-crust blackberry pie.  For an additional twist, add crumble topping to it!  If you make the free form little tarts, don't get hung up on the looks, they just need to stand up enough on the sides to hold the filling in.
Be sure to leave a comment and receive an entry in the drawing for the lovely cookbook, The Country Cooking of IRELAND!
See previous post (Easy Irish Soda Bread) for details.

Rustic Blackberry Tarts

Blackberry Filling:
2 1/2 cups fresh blackberries
1/3 cup sugar
2 tablespoons flour.
1 tablespoon butter, divided
2 tablespoons blackberry or raspberry jam, heated until it melts


Flaky Pastry:
2 cups flour
1 tablespoon sugar
1 teaspoon salt
2/3 cup cold Crisco
6 tablespoons ice water

Preheat oven to 425 degrees.  
In a medium bowl, toss blackberries with sugar and flour.  Set aside.

In a large bowl, mix together flour, sugar and salt.  Add Crisco, and with a pastry blender or two knives, cut in Crisco until mixture resembles coarse cornmeal.  Sprinkle on ice water, one tablespoon at a time while tossing mixture up from the bottom with a fork.  With your hands, gather the dough to form a ball.  Place on a lightly floured cutting board and press into a square about 5x5 inches.  Sprinkle with flour, then roll into 14x14 (approx) square.  Cut down the middle horizontally and vertically to create 4 squares of dough.  Place a square on a cookie sheet.  Using a half cup measure, scoop a slightly heaping measure of berries, scooping down to the bottom of the bowl to make sure you get enough sugar and flour.  Carefully mound in the center of dough square.  Bring together two corners (as if to fold a sheet) and pinch from the fold (resting on the cookie sheet) halfway up, folding over and pinching again, so it holds.  Let the little point flop over informally.  Repeat for the remaining three corners.
Dot tarts with butter.  Bake for 30-40 minutes until filling is bubbling.  If crust starts to brown too quickly, lay a piece of aluminum foil  lightly over the tarts.  When they're done, brush with melted jam.  Serve warm with whipped cream, clotted cream or vanilla ice cream!

Friday, February 25, 2011

Easy Irish Soda Bread and Irish Cookbook Giveaway!


"Every St. Patrick's Day every Irishman goes out to find another Irishman to make a speech to."
~Unknown
My blog debuted in July and I've been waiting all the many months since for March to arrive.  Oh, wonderful March, when for one day the whole world turns green.  You know what I'm talking about...St. Patrick's Day! In the US, March has also been proclaimed as Irish-American Heritage Month by US Congress.  It's kind of a big deal around here!
St. Patrick's Day in the U.S.:
Did you know the Irish Society of Boston organised what was not only the first Saint Patrick's Day Parade in the colonies but the first recorded Saint Patrick's Day Parade in the world on 18 March 1737. (The first parade in Ireland did not occur until 1931 in Dublin.) New York's first Saint Patrick's Day Parade was held on 17 March 1762 by Irish soldiers in the British Army. The first celebration of Saint Patrick's Day in New York City was held at the Crown and Thistle Tavern in 1766, the parades were held as political and social statements because the Irish immigrants were being treated unfairly. (Wikipedia)
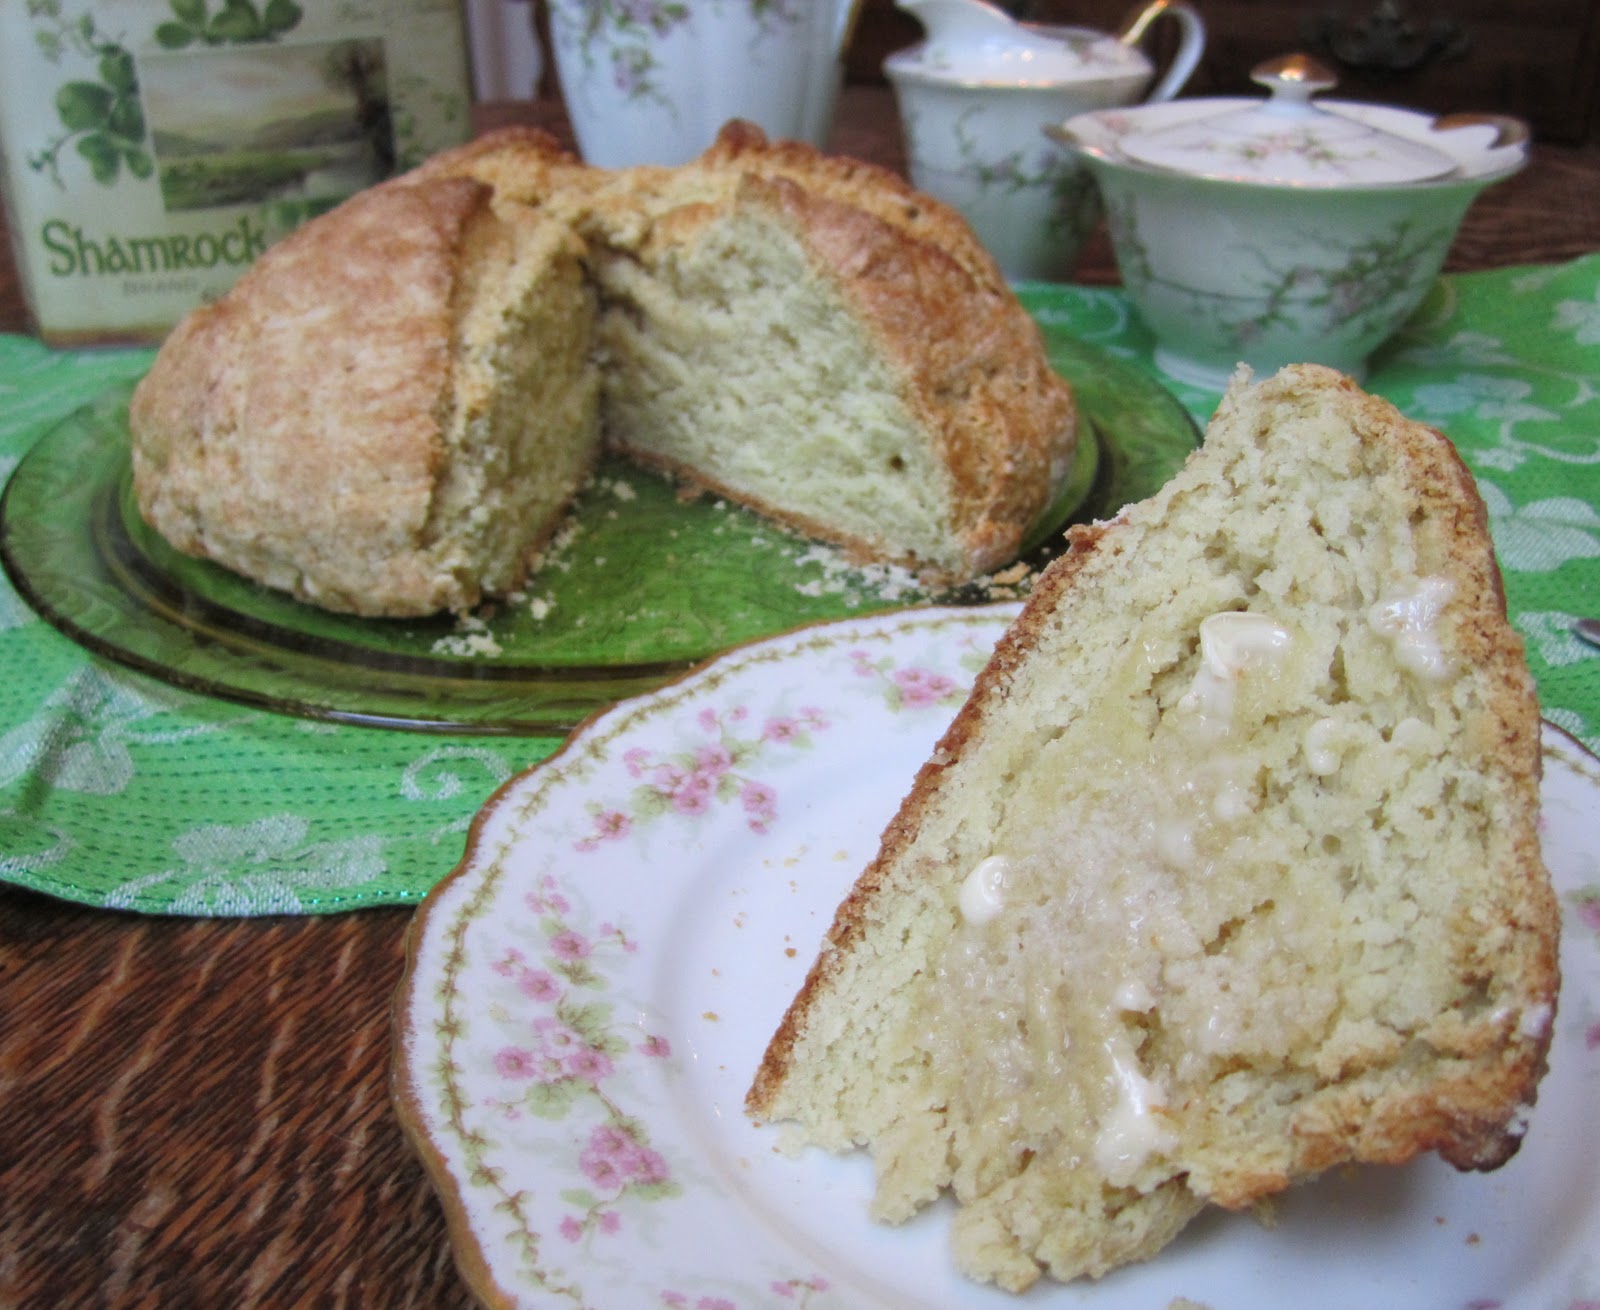
To celebrate, I'm going to post only Irish recipes for the next couple of weeks and a bit about my Irish heritage. For starters, I'm sharing with you my favorite (and easiest) Irish Soda Bread.  It is devoid of raisins, seeds and embellishments because my children don't like them.  I'll be sharing some other Irish soda bread recipes with you as well.  There are many varieties.  After all, it's really like a big scone, isn't it?  This one is slightly sweet, light and addictive!  Warm from the oven with butter melting into it...one of life's simple pleasures.  Very easy to whip up and to give as gifts too.  

Although I don't cook Irish food exclusively, I do love it and to spread some inspiration, I'd like to share a fabulous Irish cookbook with one lucky reader. Here is what Ruth Reichl, Editor In Chief, GOURMET Magazine, had to say about it (from back cover of book):

"Reading this lovely book makes me want to do two things. Get on a plane and go straight to Ireland.  And run into the kitchen and start cooking.  This is an inspired introduction to an overlooked cuisine."

Enter for a Chance to Win this Cookbook!
This is a lovely, hardcover, beautifully written, 383 page book ($50 value) with wonderful Irish recipes that will inspire you. I'll share a few of them here. 
All you have to do for a chance to win it, is leave a comment on any of my blog posts between now and March 17, 2011.  You'll receive an automatic entry for every comment.  If you tweet about it, send a copy to @TheIrishMother and I'll toss in an additional entry for you!
 I'll announce the winner on March 23, 2011.

Easy Irish Soda Bread

3 3/4 cups flour
1/4 cup white sugar
1 tablespoon baking powder
1 teaspoon baking soda
1/2 teaspoon salt
1/2 cup melted butter
1 cup buttermilk
1 egg, slightly beaten

Preheat oven to 375 degrees.  Either grease a cookie sheet, or place a piece of parchment paper on it.
In a large bowl, mix together flour, sugar, baking power, baking soda and salt.  Pour in melted butter, buttermilk and egg and stir together JUST until it comes together.  Do not overbeat, or it will give it a tough crumb.
Turn dough onto a floured board and knead lightly, just 3 or 4 folds.  Form dough into a round and place on prepared baking sheet.
In a small bowl, mix together 2 tablespoons melted butter and 2 tablespoons cream.  Brush loaf with this mixture, sprinkle with sugar and using a sharp knife, cut and X into the top of the loaf.
Bake in a preheated oven 40 - 50 minutes, or until a toothpick inserted into center of loaf comes out clean.

Thursday, February 24, 2011

Spicy New England Pot Roast

“Smell brings to mind... a family dinner of pot roast and sweet potatoes during a myrtle-mad August in a Midwestern town. Smells detonate softly in our memory like poignant land mines hidden under the weedy mass of years.” 
~Diane Ackerman 


This unique version of a beefy classic intrigued me with it's ease and addition of cranberry sauce and horseradish.  The result was a great sweet and sour vibe which we all enjoyed.  It really worked.  Since the juices are not the traditional savory gravy usually served with pot roast, I opted against serving it with mashed potatoes and served it instead with mashed turnip, which can stand on it's own, maybe with a pat a melting butter, no gravy needed.  I'm making all the long-cooking meals I can before spring arrives and my palate turns to the grill and the fabulous in-season vegetables and fruits that will begin to arrive at the market.

Spicy New England Pot Roast
(from The Essential NY Times cookbook)


3 tablespoons flour
2 teaspoons salt
1/4 teaspoon pepper
One 4-pound boned and tied arm, blade, or bottom round roast
3 tablespoons bacon drippings or vegetable oil
1/2 cup freshly grated horseradish  or drained prepared horseradish (4-ounce jar)
1 cup whole berry cranberry sauce
1 cinnamon stick, broke in two
4 whole cloves
1 cup beef broth
16 small white onions (you can use jarred or frozen)
1bunch carrots, peeled and cut into 3-inch lengths


1. Mix the flour with the salt and pepper.  Dredge the meat in the flour, rubbing the mixture into all the surfaces.
2. Heat the drippings in a Dutch oven or other heavy casserole and brown the meat very well on all sides over high heat.  Drain off drippings.
3. Mix together the horseradish, cranberry sauce, cinnamon, cloves, and broth and add to the meat.
4. Cover and bake at 325 degrees for 4 hours.  For the last hour, add carrots and onions.  Before serving, remove roast to a platter and cover with foil.  Pour drippings into a pitcher, drain off any fat from the top, and serve.

Wednesday, February 23, 2011

Campanelle with Broccolini and Sausage

"As long as there's pasta and Chinese food in the world, I'm okay"
~Michael Chang

Recently, I had a workday that was so busy I didn't get a chance to eat lunch.  Therefore, all afternoon I was starving and thinking about dinner.  I daydreamed of something healthy, fabulous and satisfying, yet quick and easy.  When I saw the great-looking broccolini in the produce section, I decided to do something with it and this is what I came up with.  It fit the bill PERFECTLY.  Broccolini is broccoli's milder cousin, and goes so nicely with the hot sausage.  It adds a perfect crunch to the chewy pasta and sausage.  I was inspired by the dish orechiette with broccoli rabe and sausage, and although you could use broccoli rabe, and I don't mind it, the Mister finds it bitter, so it's brocollini for us.  Barilla Campanelle is my favorite pasta and I always have several boxes around, so that was a no-brainer.

Now, usually I don't save pasta for leftovers, but this dish was too good to dispose of.  Since we only ate about half of it originally, two days later I heated the leftovers in a covered dish in the oven (yes, we are the only people on the planet without a microwave...on purpose!)  A few minutes before they were heated through, I warmed some heavy cream, then tossed the hot pasta with it and one-third cup of parmesan cheese.  Sort of dressed it up Alfredo style.  It was a twist from the previous meal and it was delicious.  Yeah baby...nom, nom, nom!

Campanelle with Broccolini and Hot Sausage


I pound hot Italian sausage
1/4 cup olive oil
3 cloves of garlic, minced or run through a garlic press
1 pound fresh broccolini, chopped into 3-inch lengths
10 ounces Barilla Campenelle
1 cup white wine
salt and freshly ground black pepper
1 cup freshly grated Parmesan cheese


Preheat oven to 350 degrees.  Place raw sausages in a pan, prick with a fork and bake for 30 minutes.  Remove from oven and slice on the diagonal.  Cover with foil to keep warm.  Place a large pot of salted water on to boil.  Add pasta to rapidly boiling salted water.  Boil for 8 minutes, then add broccolini to boiling  pasta and cook together for the remaining 3 minutes.  While pasta is cooking, heat olive oil in a large skillet over medium heat and add garlic, stirring for a minute, but do not let garlic brown (it will turn bitter).  Add wine to skillet and stir, allowing to reduce slightly while pasta finishes cooking.  Before draining pasta, save 1/2 cup of the pasta water and set aside.  Drain pasta/broccolini mixture and add to skillet with garlic, tossing as you go.  If you think it needs more liquid, you can add some of the pasta water that you reserved.  Toss pasta with 1/2 cup of the Parmesan, turn onto a serving platter and then sprinkle with remaining Parmesan and salt and pepper.