Friday, October 29, 2010

Cranberry Coffee Cake

American and Canadian sailors on long voyages knew they could eat cranberries to protect themselves from scurvy -- making them a cranberry counterpart to British "Limeys."

I absolutely love cranberries and this is the first of a few recipes that I'll share to showcase them.  Their juice is my favorite.  I have to have it in the house at all times or I get cranky.
Some cranberry facts:
The cranberry is one of three fruits native to North America. The other two are the Concord grape and the blueberry.

Wild cranberries were probably served at the first Thanksgiving meal.

If you lined up all the cranberries produced in North America in 2000, they would stretch from Boston to Los Angeles more than 565 times.

The first cranberry crop was harvested in 1816 in Massachusetts.

Cranberry juice contains a chemical that blocks pathogens that cause tooth decay


Timeline:
1550 Native Americans use cranberries for food, dyes and medicine. 
1620  Pilgrims learn to use cranberries from the Native Americans. 
1816 Captain Henry Hall first cultivated cranberries in Dennis, MA. 
1820s  Cranberries shipped to Europe for sale. 
1854 First census on cranberry acreage - 197 acres in Barnstable County, MA. 
1930 Ocean Spray formed as a grower-owned marketing cooperative.
1947 Walk-behind mechanical dry harvesters replaced hand scooping. 
1953  First million-barrel national crop. 
1959 Cranberry scare causes industry market to crash. 
2002 Two independent studies find that antioxidants—which cranberries are high in—appear to provide some significant protection against Alzheimer’s disease.
Cranberry Bog, Marstons Mills, MA


As I've mentioned here before, I love all things sweet and decadent in the morning best of all, eaten when you are actually hungry and you can linger, savoring every morsel.
Speaking of Linger; that is one of my all-time favorite songs and
it's by.....Yes, you know it.... The Cranberries,
an Irish rock band formed in 1989.


This coffee cake is old fashioned and sweet.  It reminds me of my great-grandmother, who's coffee cakes oft tasted of either almond or candied fruits.  

I haven't had much time lately.  You know how it is.  Life has a way of occasionally steamrolling you and I've found it easiest at those times to just roll along instead of fighting it.  When I finally had a moment to pause, I whipped up this cake.  It's easy, even the batter is yummy and you don't have to delay gratification because it's just as good warm or cold.

Cranberry Coffee Cake
Batter:
1 1/2 sticks of butter, softened
1 1/2 cups sugar
3 eggs
3 cups flour
2 teaspoons baking soda
1/2 teaspoon baking powder
3/4 teaspoon salt
1 1/2 cups sour cream
1 1/2 teaspoons almond extract
1 (15 ounce) can cranberry sauce
Topping:
4 tablespoons butter, softened
3/4 cup brown sugar
3/4 cup chopped nuts
1/4 cup flour
1/2 teaspoon cinnamon
1/4 cup dried cranberries (optional)
Glaze:
3/4 cup confectioner's sugar
1 tablespoon hot water
1/2 teaspoon almond extract

Preheat oven to 350 degrees.  Grease a 12-inch Spring-form pan.  Cream butter and sugar.  Add eggs, one at a time, and almond flavoring.  Combine the dry ingredients and add to the batter alternating with the sour cream.  Pour batter into the prepared pan, alternating batter, cranberry sauce and batter.  Mix together all of the topping ingredients, except dried cranberries.  Sprinkle over batter and then sprinkle on the dried cranberries last.  Bake for 1 hour.  Test by inserting a sharp knife into center of cake; if it comes out clean, cake is done.  Remove to a rack, cool 10 minutes.  While cake is cooling, make the glaze.  Stir almond extract and hot water into the confectioner's sugar.  Add more hot water in tiny amounts until you get the right consistency to drizzle off of a spoon.  Drizzle on cake.  Enjoy warm or cold.

Wednesday, October 20, 2010

Fall and Oats

"A balanced diet is a cookie in each hand" ~ Unknown
This Saturday will be the peak for "leaf-peeping" in Connecticut.  Something that gets a lot of news coverage in New England.  Some years are better than others for color and this year is turning out to be a vivid one.  Just for fun, I've taken some photos in and around my town to give you a little "peep" into our New England Fall.  

Then, a cookie recipe.  Namely, our favorite oatmeal raisin cookie. A cookie that reminds me of Fall.  When I was about 20, I used to get a huge oatmeal cookie from a bakery and eat it for lunch.  This is the recipe closest to the bakery one. These cookies never last more than 24 hours in our house.  They are crispy on the outside, chewy on the inside, and it's hard to eat just one.  I'm also throwing in my recipe for cranberry-almond granola.  I've been making it a lot.  It's really easy and great for a quick breakfast, a topping for yogurt, or stirred into a bowl of hot oatmeal.  These cooler, darker mornings seem to have put me in the mood for oats and I always use the old fashioned kind.  I've already gone through a large canister this week.  Here's a tip: You can use the canister to stack cookies (individually wrapped in wax paper) for shipping to someone who might appreciate a taste of home.  Know anyone away at college?  Know anyone who likes cookies?
How psyched would you be if you got this in the mail?


Oatmeal-Raisin Cookies

1/2 cup butter
1/2 cup Crisco (important for that crispy outside)
2 T. molasses
1 cup firmly packed brown sugar
1/2 cup granulated sugar
2 eggs
1 teaspoon vanilla
1 3/4 cups all purpose flour
1 teaspoon baking soda
1 teaspoon cinnamon
3/4 teaspoon salt
3 cups old fashioned oats
1 cup raisins

Preheat oven to 350 degrees.  Cream the butter and Crisco together.  Add molasses, sugars, vanilla and eggs and beat together.  In a separate bowl, stir together the flour, salt baking soda and cinnamon.  Add to the wet ingredients and beat well.  By hand, stir in the oats and raisins.  Drop by large heaping tablespoons onto ungreased cookie sheet.  I make them so large that only 6 will fit on the cookie sheet.  
Bake 11-13 minutes or until golden brown.  
Cranberry-Almond Granola

3 tablespoons butter
1/2 cup honey
4 cups old fashioned oats
1 cup shredded sweetened coconut
1 cup sliced almonds
1 cup dried cranberries

Preheat oven to 350 degrees.  In a small saucepan on low, heat together the honey and butter, just until the butter melts.  Do not boil it, or it will caramelize.  Place all other ingredients in a large bowl and stir together.  Pour the warmed honey-butter over it and immediately stir together.  Turn mixture out onto a greased cookie sheet and pat down lightly.  Bake for about 11 minutes, then remove from oven and push the granola in the corners of the pan toward the middle, and pull some of the middle granola towards the sides of pan.  This step is simply to help it brown evenly. Pat down again.  Return to oven for 5 or 10 more minutes until golden brown.  Remove from oven to cooling rack.  Allow to cool completely, then break up and store in a Ziploc bag.

Sunday, October 10, 2010

Chocolate Guinness Cake


An Irishman is the only man in the world who will step over the bodies of a dozen naked women to get to a bottle of stout. ~ Unknown

A few days ago, I cast a net out on Twitter, seeking "the best brownies in the world."  Consequently, I received a tip from @fstop23 to find the post from @OakMonster for the this cake (she blogs at http://tinyurl.com/3de65d).  It is from Nigella Lawson's cookbook Feast

Hurriedly I ran out to get me some Guinness Stout!  I figured a recipe that came so highly recommended  was worth a shot.  Besides, the box mix brownies I made to try to quell the chocolate monster were not cutting it (although the raw batter wasn't bad). 

This cake was incredibly easy.  Practically a one pot deal.  No butter to soften.  No layers to juggle.  The finished product smells divine and is like a cross between cake, brownie and gingerbread.  You might wonder what beer does to cake if you've never had Stout Cake.  Guinness Stout is dark in color and has a "toast" or "coffee" flavor.  Some of my best chocolate dessert recipes include coffee or espresso as it enhances the richness of chocolate and tweaks it up a note.  This cake has a dense and moist crumb and tastes so good with the cream cheese frosting. Don't let the Guinness scare you, it makes for good cake.  Once it came out of the oven, I could hardly keep them away from it long enough to frost it!


Chocolate Guinness Cake


1 cup Guinness stout (not the whole can or bottle)
1 stick butter
¾ cup unsweetened cocoa powder
2 cups granulated sugar
¾ cup sour cream
2 eggs
1 tablespoon vanilla extract
2 cups all-purpose flour
2 ½ teaspoons baking soda
Icing
8 ounce cream cheese
1 cup confectioners' sugar
½ cup heavy cream (I only used 1/4 cup)
Method
Preheat oven to 350 degrees. Butter a 9-inch springform pan (I used a tube pan with cake insert) and line bottom with parchment paper.
Trace pan on parchment paper, then cut out.
Pour Guinness into a large saucepan, add butter and heat until melted.
 Whisk in cocoa powder and sugar. In a small bowl, beat sour cream with eggs and vanilla and then pour into brown, buttery, beery mixture and finally whisk in flour and baking soda.
Pour cake batter into greased and line pan and bake for 45 minutes to an hour (Check at 45 minutes for doneness, poking a skewer in center.). Leave to cool completely in the pan on a cooling rack, as it is quite a damp cake.
When cake is cold, gently peel off parchment paper and transfer to a platter or cake stand.
Place cream cheese and confectioners' sugar in a mixing bowl, and whip with an electric beater, until smooth (You may also do this with a food processor.).
Add cream and beat again until you have a spreadable consistency.
Ice top of cake, starting at middle and fanning out, so that it resembles the frothy top of the famous pint.

Friday, October 8, 2010

The Popover Showdown: Stonewall Kitchen Mix vs. Never Fail Popover Recipe

Cooking is like love. It should be entered into with abandon or not at all.  
~ Harriet Van Horne
I hadn't made popovers in a couple years and was craving them last week.  Having just started a corned beef glazing in the oven,  I thought "I think I'll whip up some cheddar popovers to go with dinner."  Sounds harmless enough, doesn't it?  Well, this is where I really got my blonde on.  There are a couple of secrets to making popovers "pop."  One of them is a hot oven and another is, for the first 20 minutes of cooking, DO NOT OPEN THE OVEN DOOR.  

So, naturally I crank up the oven to 450 degrees and stick my newly filled popover pan in there, then sit back and lick my chops.  Wrong!  Thus began my epic fail.  Ten minutes in, I smell smoke. 15 minutes in and a haze is looming below the kitchen ceiling.  I can see that the corned beef glaze is beginning to burn.  I start wringing my hands.  After all, I CAN'T open the oven door...that would be breaking the cardinal rule of popover baking.  And I'm jonesing for my cheddar pops!  I peer in the window of the oven.  I can't see much, because it's dirty.  The middle rack was up a notch so I could fit both items in the oven and the popovers were working their magic, but were also now precariously close to the top oven element.  Sort of starting to burn, I think.  Or is that just grime and soot on the window?
What to do?! What to do?!
I had to break the cardinal rule, may the popover gods smite me.  Haze was beginning to fill the house.  The smoke alarms were going off.  When I opened the oven door, an acrid cloud of smoke billowed out into my face, burning my eyes and temporarily blinding me.  I'm bent on saving those popovers, damn it!  So I grab the corned beef quick to get it out of there and slam the oven door!  I feel a tingle and look.  Somehow in the mayhem I had burned the skin off a two-inch strip of my forearm, leaving a white stripe where my meager tan had been.  It didn't hurt yet....wasn't bleeding...I'd deal with that later.  I really should know better.  Really.  But I have a theory that the blonde gene is dominant and occasionally surfaces, tempting me with stupid ideas, taking over and making me do blonde things, such as backing my new car into immovable objects like other cars, trees and curbs, and testing the sharpness of knives with my finger (OK, that was a long time ago).

The corned beef didn't look too bad.  A little black on the corners where the glaze burned.  I could call it Candied Corned Beef (Candy Corn Beef?) My primary concern was the popovers.  They were not happy.  Definitely starting to shrink.  It reminded me of that scene in the Wizard of Oz where after the house falls on the witch her toes and feet wither and curl up then retreat under the house.  Ugh.  Not good.  Not pretty.  Definitely not blog-worthy.  But not too bad if you like burnt cheddar, which, oddly enough, I do.  I even got a "Good cheesy bun-thing, Mom" out of Keith.  I'll take it.  

So here we are.  Not one to shy away from a challenge, I knew I would be making the popovers this week.  This time with no fire hazards competing for oven space.  I would give them my full attention and devotion....coaxing them to pop their little heads off.  And to make it interesting, I would compare the ages old "Never Fail Popover" recipe to the box mix for Traditional Popovers from Stonewall Kitchen.  

You know, they're actually easy when you do them right.  Just a few things to remember.

1. Preheat oven AND popover pan
2. Have eggs at room temperature and milk warmed on stove.
3. DO NOT open the oven door for 20 minutes.

If you follow these basics, you end up with the unique and delicious popover.  Inexpensive, but delightful. Crispy on the outside, crepe and souffle-like on the inside.  I like them made with cheddar for dinner, but they are fabulous with butter and jam, honey or lemon curd for breakfast.  
Never Fail Popovers Recipe                                            
My introduction to them was 10 years ago at Jordan Pond House in Acadia National Park http://www.thejordanpondhouse.com/.  There, serving popovers is a tradition that dates back 130 years.  It's a charming place that has outdoor seating overlooking Jordan Pond.  The dining experience was so unique, I've never forgotten it, and have been a popover lover ever since.  If you end up anywhere near Bar Harbor in Maine, it should be on your short list.
Stonewall Kitchen Traditional Popover Mix
As for The Popover Showdown; the Stonewall Kitchen mix was a little easier (made according to box directions), and I would have to say the popovers looked a little prettier, whereas the Never Fail Popover recipe tasted better, but I quote The Mister, "not that much better."  


Never-Fail Popovers


2 eggs, at room temperature
1 cup milk, heated on stove to warm (but not hot enough to cook the eggs)
1 cup flour
½ teaspoon salt
1 tablespoon butter, melted

Preheat oven to 450 degrees.  Place popover pan or muffin tin in oven while preheating.  Break eggs into a mixing bowl; add milk, flour and salt.  Mix well with whisk.  Remove popover pan from oven and quickly brush cups liberally with butter.  Fill well-buttered muffin pans ¾ full.  Place in oven on middle or middle-lower rack and shut door.  DO NOT OPEN DOOR.  At 20 minutes, turn oven down to 375 and cook popovers an additional 15 to 20 minutes or until puffed and dark golden brown.  Makes 6.

To make cheese popovers, just take a cup of cheddar or grated Parmesan and sprinkle popovers before baking.

*Disclaimer:  The author of this blog does not have any relationships with brands, companies or advertising agencies.  Any mention of brands are purely the authors own opinion.


Thursday, October 7, 2010

Easy Weeknight Meal: Chicken Enchiladas

I drive way too fast to worry about cholesterol.  
~ Steven Wright
I admit that these might not pass as enchiladas in Mexico, or even Texas for that matter.  But in Connecticut they are saucy-cheesy, lick your plate, bad-ass enchiladas.  My daughter and her friends have been known to raid the fridge late at night and eat the leftovers cold.  I came up with this recipe one day based on what I had in the house, and it stuck.  Now we have them every couple of weeks and I've even made them for company (who then asked for the recipe).   You start with a pre-cooked rotisserie chicken, which makes them REALLY easy.  It only takes a few minutes to throw together the filling, and half an hour later, dinner is served!

Chicken Enchiladas

1 large (or two small) fully cooked rotisserie chickens, cooled (need at least 3 cups of chicken)
1 cup sour cream
1 10 ounce brick of sharp cheddar cheese, shredded (I use Vermont cheddar)
2 tablespoons cream cheese
1 8 ounce can tomato sauce
4 8 inch flour tortillas
1 (1 ounce) package low-sodium taco seasoning
1 (10 ounce) can enchilada sauce
1 (10 ounce) can black beans, drained and rinsed (optional)

Garnishes (all optional):
Red salsa
Salsa verde
Sour cream
Scallions, sliced
Iceberg lettuce, chopped
1 large tomato, chopped
Black olives, sliced

Preheat oven to 350 degrees.  Don a pair of dish-washing gloves and dismantle the rotisserie chicken, removing skin, getting as much meat as you can from it.  Chop chicken meat into 1 inch pieces; place in a large non-stick skillet.  Shred the cheddar cheese and place half of it in the skillet with the chicken.
Add sour cream, cream cheese and tomato sauce to the skillet as well.
Cook on medium high until all ingredients are combined and the cheese is melted.  Stir in taco seasoning.
Butter a 9x9 or 10x10 inch baking dish.  Place one tortilla in the prepared baking dish.  Sprinkle a stripe of black beans in a line down the center, spoon on chicken filling and roll up tortilla and tuck against the side of the dish, with the seam to the side or down.  Make next enchilada and repeat steps until they are all filled.  Pour enchilada sauce over and sprinkle remaining cheese on top.  Bake uncovered for 30-35 minutes or until bubbly and cheese is starting to brown.  Serves 4.
This recipe is easily doubled, for use in a 13x9 inch pan (to serve 8), by adding extra chicken at the beginning and stretching it to fill 8 tortillas instead of 4.  Then just pour 2 cans of enchilada sauce over instead of one.  Viola! It's that easy.


Friday, October 1, 2010

In Honor of World Vegetarian Day: Spinach Strudel and Top Ten Misconceptions About Vegetarians

"I could have been a great vegetarian, If only I didn’t love steak so much."
~Me
Since today is World Vegetarian Day,  I decided to go meatless and  concocted a spinach strudel to celebrate.  This was great timing, since I was planning to post a vegetarian meal as requested by my friends at the Peace House.  Okay, they’re actually my son’s friends, but any friends of my kids are friends of mine.  Unless they’re pushing drugs, or that kid who uninvited Audrey to the prom the day after she bought a dress.

In honor of promoting peace, I put together a list of Top Ten Misconceptions about Vegetarians.  Stereotyping is bad, people.  All vegetarians aren’t weird anymore than all meat eaters are Jeffrey Dahmer. This is one minority that is very misunderstood.  Hug a vegetarian today (if you can find one, but not too hard).

Top Ten Misconceptions About Vegetarians:
 1.  They are starving, boney and fragile
 2.  Are hypochondriacs afraid of Mad Cow disease
 3. All live in California, were born there, or want to move there
 4.  Are actually the Green Party
 5.  Are all Buddists
 6.  All have hairy armpits and wear Birkenstocks
 7.  Are malnourished
 8.  Occasionally enjoy herb, and sometimes even grow it in their backyard (wink, wink)
 9.  Favor dreadlocks (no wait...that would be those who favor herb)
10.  Are cool people who can take a joke! (ok, that’s not a misconception J)

I drew inspiration for this recipe from 3 sources;  the vegetable strudel recipe in The Enchanted Broccoli Forest, a mushroom canapĂ© recipe of my mother's, and of course, Spanakopita.

DON'T FEAR THE FILO, people!  It really is not difficult to use if you keep in mind a few things.  Always thaw it out in the fridge at least overnight, and then let it come to room temperature without unwrapping it!
If you try to use it and it's still even partially frozen, it will be brittle and impossible to work with without breaking into a million pieces.  Make your filling ahead of time and then set up your workstation with filling, melted butter, basting brush, baking dish, and a damp towel to cover filo stack while you're busy basting butter on the sheet in use. If you follow these procedures, it's not hard and the payoff in flaky goodness is worth it!  If you absolutely, positively know you won't attempt it, then a shortcut would be to follow the directions for Spicy Beef Pies http://theirishmother.blogspot.com/2010/09/individual-spicy-beef-pies.html but substitute the Spinach filling.

Spinach Strudel

2 tablespoons olive oil
1 cup diced onion
1 clove of garlic, run through press or minced
10 ounces mushrooms, chopped small
1 carrot, shredded
2 10 ounce bags of fresh washed spinach, chopped (or 2 10 ounce boxes of frozen chopped spinach, thawed and squeezed of excess water.
2 tablespoons cream cheese
1 1/2 cups shredded cheddar cheese
1 tablespoon dry Sherry (optional)
3/4 teaspoon salt
1/2 teaspoon pepper
1/2 teaspoon onion powder
1/2 teaspoon garlic powder
1/2 lb filo pastry leaves, thawed and brought to room temperature
3/4 cup melted butter

In a large skillet, heat olive oil to medium-high and add onion.  Cook for a few minutes until it starts to soften, then add garlic and mushrooms. Cook for about 5 minutes, or until mushrooms start to brown.
Add carrot and cook for a few minutes.  If you're using fresh spinach, add one bag and cook for a few minutes, stirring, it will shrink down quickly, trust me.  Then add second bag and repeat.  
When the spinach has cooked down, add the cheeses and seasonings.  Taste and adjust salt and pepper, if needed.  Set filling aside and set up your workstation and preheat your oven to 375 degrees.
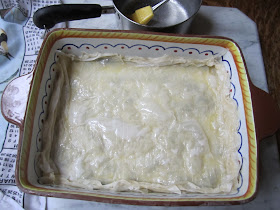
 Butter your baking dish, then take one filo sheet and place it in the dish.  It is okay if it rides up the sides of the dish.  Cover filo stack with a damp towel. Baste filo sheet liberally with melted butter (including sides).  Repeat 6 to 8 times.
Once you have 6 to 8 layers, you can spread the filling over the dough, all the way to the edges.  Place a sheet of filo on top of the filling and brush with melted butter.  Repeat 6 to 8 times. 
Gently tuck down any of the dough that was riding up the sides of the pan.  With a pizza cutter, gently roll out a diamond pattern on the pasty.
Bake uncovered for 35-40 minutes, or until nicely golden brown.  Let it cool for 5-10 minutes before cutting into squares.  Serves 9.